How to install an SC connector
Supplies required:
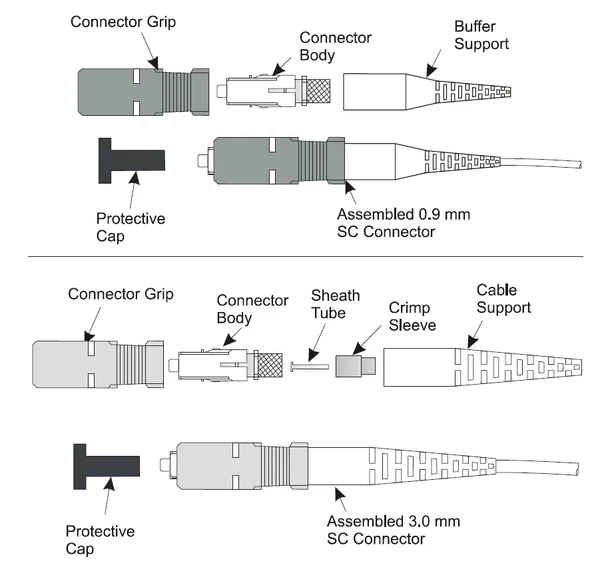
Fiber optic cable SC connection
optical fiber stripper
Cleaver of fiber
ethanol-epoxy wipes
Paper polishing Step 1: Remove the fiber
Carefully remove the outer jacket and buffer coating from the fiber using a fiber optic stripper, leaving roughly 3 cm of exposed fiber. Avoid scratching the surface or inflicting any harm to the fiber.
Next, wash the fiber.
To get rid of any oil or grime, use alcohol wipes on the exposed fiber. Examine the fiber under a microscope for flaws or damage.
Third step: cutting the fiber
Make a precise cut on the fiber's end using a fiber cleaver. To guarantee that the fiber is flush with the end, a clean cut is required.
Step 4 is to affix the fiber to the connector.
The fiber should be inserted into the connector until it is flush with the ferrule end. To hold the fiber in place, add a dab of epoxy to the connector's end.
Step 5: Let the epoxy cure.
Follow the manufacturer's instructions to let the epoxy cure. Depending on the type of epoxy used, this can take several minutes or longer.
Sixth step: clean the connector
Starting with a coarser grit and working your way up to a finer grain, polish the connector's end face using polishing paper. The finished face should have a flawless, level surface that is devoid of flaws and scratches.
1493
0
768
172


Contact Info
- Address: CP Cables Limited | Mombasa Road, Next to Panari Hotel
- Phone: 0708 584883 | 0800 721343
- Email: sale@cpcables.co.ke